



Expert protocol: 4 steps for a thorough vehicle inspection
To check a hire car for damage effectively, you need to carry out a 12-minute perimeter inspection, document everything with metadata-stamped photos, and insist on a signed record of any pre-existing damage. This professional method protects you from unfair charges on your credit card and safeguards your deposit.
Table of Contents
Your collection checklist:
- Full perimeter visual inspection. Start at the front and walk clockwise. Examine every panel in direct natural light — the artificial lighting in underground car parks can easily conceal micro-cracks and surface scratches. If the vehicle is dirty, make sure this is noted, as cleanliness directly affects how visible bodywork damage is. Don’t skip the interior: dashboard, headlining and the folding mechanism on the rear seats (where stains from previous hires tend to accumulate).
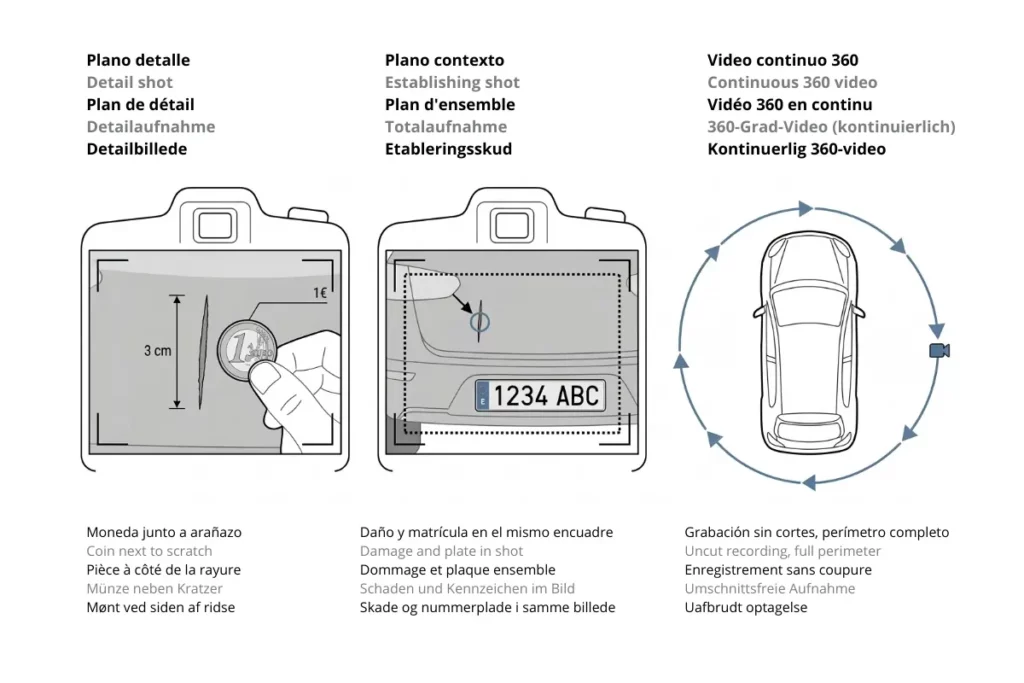
- Three-layer photographic documentation. A quick snap won’t cut it. You need three levels: a close-up shot of the damage itself, a wider shot that includes the damage and the number plate in the same frame, and an unbroken 360° walkround video in which you narrate the date, time and location. A narrated video is significantly harder to dispute.
- Line-by-line comparison with the damage report. The company will hand you a check-in form. Compare every mark you’ve spotted against what’s recorded on that document. If anything is missing, this is your moment to act.
- Signed record before you turn the key. If you find damage that isn’t listed, return to the counter and insist it is recorded in writing on the damage report or the hire agreement, with an employee’s signature. Never sign the check-in document if it’s incomplete. This step must be completed before you start the engine — driving out of the premises can be treated as tacit acceptance of the vehicle’s condition.
Expert tip: If a member of staff at the Málaga Airport car hire company refuses to record a piece of damage, film a video showing both the defect and the conversation. Send the original files to your own email address at that very moment. The EXIF metadata (date, time, GPS coordinates) embedded in those files is your digital proof of evidence.
Fair wear and tear vs actual damage: a practical guide
This is where poor industry practices really take hold. Some companies apply internal measurement thresholds they never disclose to customers, and what is classed as “fair wear and tear” today can be reclassified as “chargeable damage” if you have no evidence to back you up.
The technical distinction is straightforward: fair wear and tear is the deterioration that occurs through legitimate, ordinary use of the vehicle. Actual damage is harm that goes beyond that use and requires a garage repair. Your financial exposure depends directly on the combination of CDW (Collision Damage Waiver) cover you’ve taken out and the excess amount on your policy.
Threshold table: chargeable damage vs standard maintenance
| Type of defect | Measurement reference | Typical classification | Will you be charged? |
|---|---|---|---|
| Surface scratches | Under 3–5 cm, clear coat only | Fair wear and tear | No, within standard thresholds |
| Stone chips | Under 3 mm on bonnet or bumper | Fair wear and tear | Almost never |
| Bodywork dents | Over 5 cm, with or without paint loss | Actual damage | Yes, unless CDW with zero excess |
| Broken plastic | Cracked bumpers, broken wing mirrors | Actual damage | Yes, always |
| Deep scratches | Reaching the primer or bare metal, visible to the touch | Actual damage | Yes, requires panel respray |
| Upholstery cuts | Tears to seats or door cards | Actual damage | Yes, part replacement required |
Watch the small print: what one company considers fair wear and tear, another may class as chargeable damage — particularly on premium vehicles. Your universal defence is a thorough photographic record and a signed note on the hire agreement.
How your insurance cover translates each scenario into pounds
- CDW with excess (the most common option). You pay out of pocket for any actual damage up to the excess limit. If the repair costs £700 and your excess is £900, you pay £700. If it costs £1,300, you pay the £900 and the insurer covers the rest. Fair wear and tear generates no charge.
- Zero-excess CDW (fully comprehensive). You pay nothing for damage. It’s the most reassuring option, though the upfront cost is higher.
- No CDW (relying on your own insurance or credit card cover). You assume 100% of any actual damage costs. On top of that, pursuing a claim with your own insurer can take weeks and requires an upfront payment. We’ve seen cases where the administrative cost of the claim came close to matching the damage itself.
Visual inspection checklist: critical zones and blind spots
The most common mistake is only checking what’s at eye level. In our fleet audit system, more than 60% of disputed damage is concentrated in areas the average customer doesn’t look at in the first few minutes. This checklist is designed to be completed in 10–15 minutes, before you load the boot.
The 5 areas everyone checks (but not always thoroughly)
1. Bumpers (front and rear). Crouch down and inspect the lower edges and corners — this is where car park knocks accumulate. On a wet or dirty bumper, light damage becomes invisible. Ask for a cloth or wipe the area with your hand first.
2. Alloy wheels and tyres. Check the full circumference of each alloy for kerbing marks. A light scuff may be fair wear and tear, but a deep gouge that compromises structural integrity is classed as actual damage. Photograph close-up to document the depth clearly.
3. Windows and windscreen. Don’t just look straight on. Run your gaze (and a careful finger) across the entire surface searching for stone chips. A 2 mm chip can become a 30 cm crack during your trip as temperatures change. Point it out to staff before you sign anything.
4. Underbody. Lean down to inspect beneath the bumpers and around the wheel arches — this is where speed bump damage hides. If the car sits low, use your phone’s video mode to film underneath without having to lie on the ground.
5. Wing mirrors. Check that the housings are free of cracks, that they fold correctly (manually or electrically), and that the rear-view mirror inside is firmly fixed.
The 3 overlooked areas that make all the difference
1. The roof. Quite simply, nobody looks up. The roof is prone to dents from low branches or hail and to scratches from previous hirers’ roof racks or bike carriers. Step back a few paces and look at it from an angle — raking light reveals what a straight-on view conceals.
2. The spare tyre and its kit. Open the compartment beneath the boot floor. Check that the spare exists, is properly inflated and not deteriorated. Verify that a wheel brace and jack are included. Their absence can result in an additional charge if you get a puncture — in our fleet, we check this point at every vehicle rotation precisely because it’s one of the most frequent issues we encounter.
3. Interior upholstery and headlining. Look for stains on the seats, carpets and headlining. A coffee stain can generate a substantial specialist cleaning charge. Switch on the interior light or use your phone’s torch, particularly on the rear seats where visibility is poorest.
Expert tip: If you collect the car at night or in a poorly lit car park, your most reliable tool is a narrated video with your phone’s torch active. Film a slow walkround, exterior and interior, then upload it to the cloud immediately. The company’s own photographs are no substitute for your independent documentation.
How to build a photographic evidence pack no company can challenge
A single photo of a scratch is worth almost nothing in a dispute. What you need is a three-level evidence system that places every defect at a specific moment, location and vehicle.
Level 1: Close-up shot. Get close enough to capture the edges of the damage clearly. Place a reference object (a coin, a key) next to the defect to give an immediate sense of scale. Watch out for your own shadow — it can obscure critical details.
Level 2: Context shot. The same frame must show both the damage and the vehicle’s full number plate. This wider angle ties the evidence directly to that specific car. Repeat for every defect.
Level 3: Continuous 360° video. Start recording before you approach the vehicle. Walk slowly all the way around the full perimeter, filming from top to bottom on each panel. Then open the doors and film the interior. Narrate out loud: “I’m in the car park at [company name], it is [time] on [date].” This video also documents what is NOT damaged, which prevents pre-existing defects from being attributed to you.
The layer that makes everything bulletproof: EXIF metadata. Every photo and video contains the date, time and GPS coordinates embedded within the file. These markers are automatic and extremely difficult to tamper with. To preserve them, do not edit the images with filters and do not share them through apps that compress files and strip this data (WhatsApp, for example, removes metadata entirely). Send the original files by email or upload them directly to a cloud folder from your photo gallery.
Key insight: In the claims processes we handle internally, documentation with intact EXIF metadata resolves the majority of disputes at the administrative stage — without needing to escalate to a consumer body.
What to do if you find pre-existing damage: a step-by-step protocol
The natural instinct is to make a mental note and carry on. That is precisely the mistake a less-than-transparent company is counting on. The only valid response is a strict protocol that ties the damage to the hire agreement beyond any doubt.
The golden rule: do not leave the company’s premises. Driving away — even just around the block — can be interpreted as acceptance of the vehicle’s condition.
Immediate actions (in this order)
- Stop everything. Turn off the engine and do not leave the collection area.
- Return to the counter. Find the member of staff who dealt with you, or their supervisor.
- Point out the damage and insist it is logged on the main system. Do not accept a sticky note or a promise to “sort it later”. The damage must be recorded on the hire agreement or the official tablet.
- Obtain an updated copy. If it’s digital, ask them to email it to you while you’re still there. If it’s a paper document, ask for a printed and stamped copy.
- Check for the employee’s signature or stamp. Without this validation, your previous copy carries no evidential weight.
- Supplement with your own documentation. Even once the damage has been officially recorded, take your own photos and video with intact metadata as an independent backup.
If the member of staff refuses to cooperate: Record a video (with audio) showing the damage, the counter area, and in which you state the date, time, company name and the employee’s refusal to act. Call the company’s customer service line from that same location and request an incident reference number. Do not sign any document that releases the company from liability without this on record.

The drop-off: where disputes are won or lost
The check-out stage is where the majority of claims are decided. In our operational experience, nearly a third of all disputes arise from discrepancies during the final inspection. The procedure changes significantly depending on whether you return the car during opening hours or outside them.
Drop-off procedure comparison
| Scenario | Required actions | Main risk | Your decisive proof |
|---|---|---|---|
| During opening hours | Joint inspection with staff member + signed return document stating “no new damage” + photo of vehicle with staff member or office in the background | Being asked to sign a document with vague wording | Return receipt with stamp and an explicit “no new damage” statement |
| Outside hours / key drop | Full 360° video + documenting the key handover + photo of odometer and fuel level | Company claiming damage occurred after your drop-off | Video with intact metadata showing the car’s condition and the act of dropping the keys |
Returning with a member of staff: don’t leave without this
- Insist on a joint inspection. Do not accept “we’ll check it later”. Stay with the member of staff for the full walkround.
- Point out the pre-existing damage. Show what you documented at collection and confirm that it is logged as pre-existing on their device.
- Read the return document line by line before signing. The observations field must be blank or crossed out. If it says “vehicle apparently satisfactory”, reject it — you need “no new damage” stated explicitly.
- Create your own final record. Take a photo of the car parked in the return bay with the office or the member of staff visible in the background.
Key drop return: your evidence must be watertight
- Record a full video statement. An unbroken walkround, narrating the date, time, location and company name. Focus on any existing damage, the fuel level and the mileage.
- Document the key handover. Film yourself placing the keys in the drop box. If they’re in an envelope, focus clearly on the label showing your booking details.
- Protect the metadata. Location services and timestamp must be active. Do not edit the files. Upload them to the cloud at that moment.
The email that closes the loop
Regardless of which scenario applies, send an email to the company within 24 hours attaching your final photos and videos. Include the drop-off time, the name of the member of staff (if there was one) and your return receipt number. Write something along the lines of: “I confirm that the vehicle was returned in the agreed condition, as verified during the inspection carried out at drop-off.” This written record makes any future unsubstantiated claim significantly harder to pursue.
Been charged for damage unfairly: how to dispute it step by step
A charge on your card for damage is not the end of the road — it’s the start of a claims process in which the law is on your side. The burden of proof lies with the company, which must demonstrate that the damage was caused during your hire period and did not exist beforehand.
Three routes for making a claim (run them in parallel)
1. Formal complaint to the company. In writing — email with read receipt, or recorded delivery letter. Attach all your evidence: photos from the initial inspection, the signed return document showing no damage noted, and any correspondence. Standard response time: 30 days.
2. Raise a chargeback with your bank. Contact your bank or card provider to open a dispute. This process can provisionally block the payment while it is investigated. You typically have 60 to 120 days from the charge to initiate this, but act within the first week. Provide all your documentation.
3. Consumer bodies. If the company doesn’t respond or rejects your complaint, you can raise a formal dispute through the UK’s Alternative Dispute Resolution (ADR) scheme relevant to the hire company, or contact the European Consumer Centre (ECC-Net UK) if the hire took place in Spain. These routes are free and faster than going to court.
Comparison of routes
| Route | Urgency | Main advantage | Weakness |
|---|---|---|---|
| Direct complaint | Medium (30 days) | Required prerequisite for other routes | The company can reject it with no immediate consequence |
| Bank chargeback | High (act within days) | Can provisionally reverse the charge | Requires thorough documentation; resolution can take months |
| ADR / ECC-Net UK | Low (process of months) | Binding resolution if the company participates. Free of charge | Not all companies are signed up to ADR schemes |
What nobody tells you: your documentary evidence — photos, videos, signed return receipt — is what levels the playing field. Without it, your position is significantly weakened, though not hopeless. If the amount being claimed exceeds the thresholds for ADR or you need an urgent resolution, seek advice from a solicitor specialising in consumer law.
Mastering the technical inspection is your best defence — but choosing the right company is the first step towards a stress-free trip. For a fully transparent experience, follow the advice in our complete guide to car hire without nasty surprises.
Frequently asked questions about checking a hire car
What counts as fair wear and tear on a hire car?
Surface scratches under 3–5 cm that don’t reach the bare metal, light kerbing marks on alloys, and signs of use on the steering wheel or door sill strips. These are the inevitable imperfections of reasonable use and you cannot be charged for them.
How do I document damage so it counts as valid evidence?
You need three levels: a close-up photo with a reference object for scale, a context shot with the number plate clearly visible, and an unbroken 360° video in which you narrate the date and location. Keep the original files unedited to preserve the EXIF metadata.
Does the excess cover minor scratches?
It works the opposite way to what most people assume. The excess is the maximum you will pay out of pocket in the event of a claim. If a scratch is classed as damage and the repair costs £175 against an excess of £900, you pay the full £175. The excess doesn’t act as a ‘buffer’ for minor damage — it acts as a cap on major damage.
What happens if I don’t report damage at collection and get charged for it later?
Your ability to dispute the charge drops dramatically. By signing the handover document without any annotations, you are implicitly accepting that the vehicle was in the condition described. The company will assume that any undocumented damage occurred during your hire. That is precisely why the initial inspection is the most important moment of the entire hire.
